


Armor Granite Garage Epoxy Floor Kit
Best-in-Class Heavy Flake System with Real Granite Look
Fast Free Shipping
What's Included
Standard Kit (550 SF / 2.5 Car Garage):
- Extra-thick 100% military-grade epoxy – Up to 550 SF coverage
- 18 lbs of colored chips – 90-95% flake coverage (vs 6 lbs in Armor Chip)
- Heavy-duty fortified clear topcoat – 4 coats included (vs 2 in Armor Chip)
- 12" Calibrated Magic Squeegee – Spreads thick epoxy at proper thickness
- Etching solution + neutralizing powder – Brings slab to proper pH for adhesion
- Professional tools – 4 × 9" epoxy rollers, power mixing paddle, gloves, cut-in brush
- Spiked soles + non-slip additive – For safe application and traction
- Complete instructions + 7-day support – Phone and email support after hours
Large Kit (2200 SF / 7 Car Garage) Adds:
- 40 lbs of colored chips
- 12 gallons of clear topcoat for 4 coats (or 5 gallons Military Grade for 1 super-hard coat)
- Upgraded 18" notched squeegee
- Upgraded 18" professional rollers & frames
- 3 power mixing paddles
NOTE: 275, 550, and 850 SF kits have all quantities adjusted accordingly.
Key Features & Benefits
- 28 mils thick – All American mil-spec materials, made in USA
- DIY-friendly application – No prior experience needed for professional results
- Better than full broadcast – Easier to apply, less expensive, better looking
- Complete protection – Stain proof, mold & mildew proof, waterproof
- Chemical resistant – Resists vehicle fluids, battery acid, brake cleaner
- Hot tire proof – High impact resistant, road salt resistant
- True coverage – No concrete bleed-through or under-coverage
- Heavy-duty rated – Handles car jacks, jack stands, oversized vehicles, off-road equipment
- Easy maintenance – Slip resistant, cleans with garden hose and Simple Green
What Is Armor Granite?
Definition: ArmorGarage Armor Granite is a 5-layer epoxy coating system engineered to bond to properly prepared concrete and resist hot-tire pickup, stains, chemicals, impacts and tire abrasion wear.
Armor Granite is self-leveling and at 28 mils thick it provides long-lasting protection with a premium finish. See our full guide of What Is Garage Floor Epoxy to learn all about different types of garage epoxies; what's good and what to avoid.
The ArmorGarage Granite epoxy kit is very easy to install. With 90-95% color flake coverage and four layers of topcoat you get a better-looking and longer lasting floor than contractor and franchise company floors that cost $5,000 or more! Armor Granite is our top-of-the-line garage epoxy coating kit and our best seller.
10-Year New Look Warranty
Armor Granite comes standard with a 10-year new look warranty. Few DIY epoxy brands offer a warranty against wear. The only guarantee worth anything is the one you'll never have to use — ArmorGarage.
What good is a coating that sticks if it dulls and stains within a couple of years? See proof in our Epoxy Floor Case Studies.
The Armor Granite Epoxy Garage Finish
ArmorGarage Granite cures to a rock-hard deep-luster granite look and bonds so aggressively it becomes part of the first layer of your concrete. Similar to the Armor Chip Epoxy Kit, but with thicker epoxy, 90-95% flake coverage versus 70-75%, and four layers of topcoat instead of two — it's the top-of-the-line garage floor coating kit.
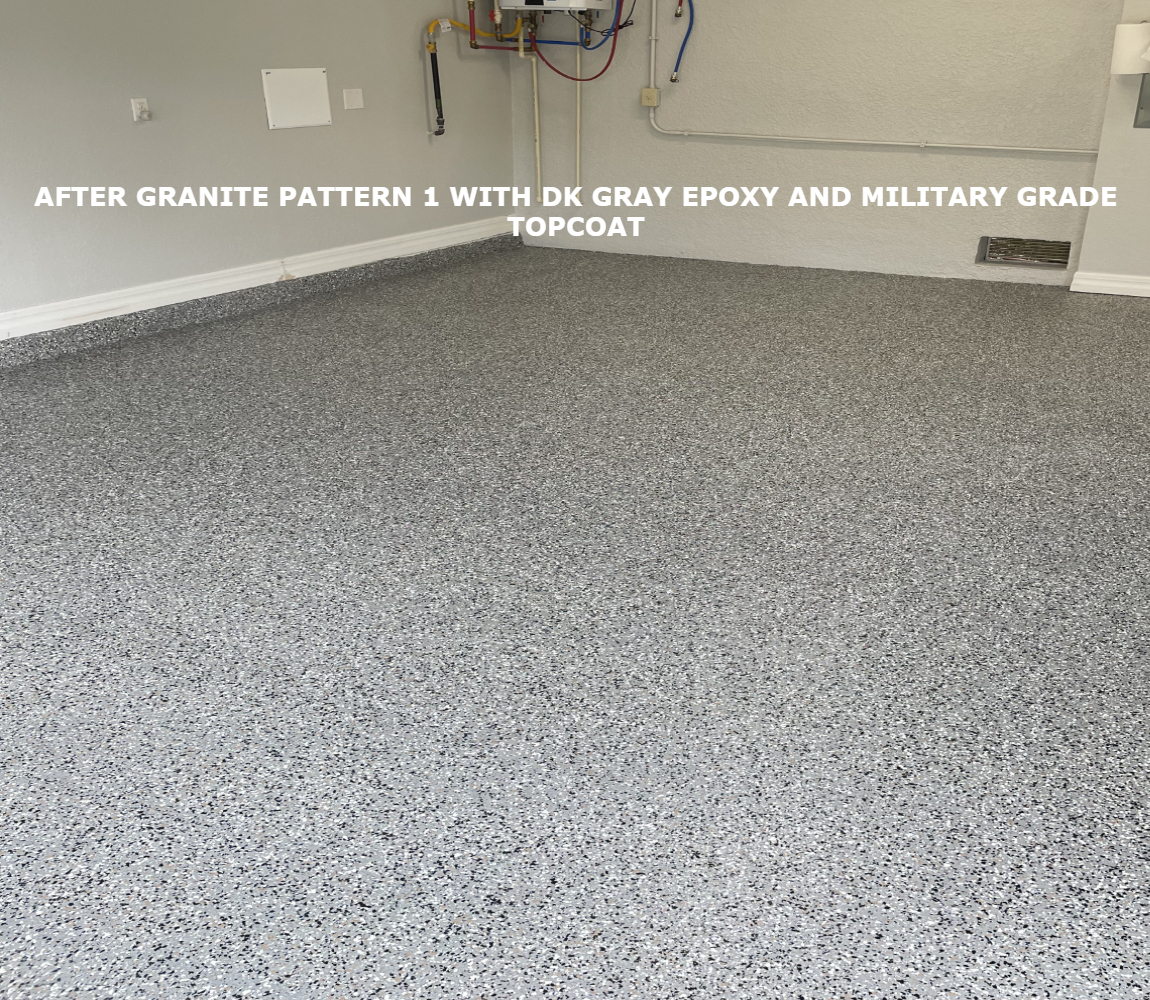
Pattern One with Dark Gray Epoxy
To have a floor like this, order Pattern One and write "Dark Gray Epoxy" in the custom note box.

Custom Color Orders at No Extra Charge
Mix and match epoxy and flake colors to create your own custom combination. Order any standard pattern in your preferred base epoxy color, then select your custom flake colors from the Color Chart tab. Enter those flake colors in the custom comment box and we'll make the change at no extra charge.
Another Happy ArmorGarage Customer
Here's a great review in the form of a two-part video from Vick in Michigan who used our Dark Gray Armor Granite kit with the Military Grade Topcoat. Part 1 shows the floor after a full Michigan winter. Part 2 shows how easily it cleans back to looking brand new.
View Part 1 Video Before Spring Cleanup — View Part 2 Video After Spring Cleanup
First-Time Install — Professional Results
“Installation was flawless. Thank you for all the support. This was my first epoxy floor.”
Derrick’s first-ever epoxy floor came out looking like a professional installation. The Armor Granite system’s calibrated squeegee and detailed instructions make results like this achievable for any first-time user. Derrick used Pattern 1 with the military topcoat.


Epoxy Topcoat Selection Guide
Choose Military Grade Topcoat (4 mg abrasion rating) if you have:
- Workshop or workshop-type garage with heavy tool chests and floor jacks
- Frequent equipment use or heavy rolling loads
- Tractors, ATVs, or rubber-tracked/wheeled equipment
- Exotic high-performance sports cars
- Retail with high-volume foot traffic or shopping carts
Standard Heavy-Duty Topcoat works great for:
- Standard cars and SUVs with light tinkering
- Woodworking shops with mostly stationary equipment
- Retail locations with normal foot traffic
Ease of Application
We provide everything needed to complete the job properly, so you only do this once! Unlike cycloaliphatic epoxies that bubble or lower-quality solids epoxies that don't yield rated coverage and have concrete bleed through, our 100% pure military grade epoxy self-levels to a smooth, high-luster finish. See how to prep & epoxy paint your garage floor the right way for a guaranteed installation you won't regret.
What to Use On
Armor Granite epoxy floor coating is for residential garage floors and commercial concrete floors. It can handle any size vehicle, off-road, rubber tracked equipment, small aircraft, workshop tools, and harsh environments. It can be applied to previously painted floors. If your old coating is worn down but not peeling everywhere, see the "Must Read" tab to learn how to apply over an existing coating.
Questions? Call 866-532-3979 or email info@armorgarage.com
We provide full unlimited phone and email support.
Shop All Our Epoxy Kits For Garages →
See All Our Educational & Buyer's Guide Articles on Epoxy Flooring →
Armor Granite Custom Garage Floors & Colors
Choose from 10 standard epoxy and chip color patterns, or mix and match to create your own custom combination. It's super easy to customize your order any way you want.
Custom Example: One customer loved Pattern 5's flakes but wanted Desert Tan instead of the standard Tan epoxy. Simply select Pattern 5, then note "Desert Tan Epoxy" in the Custom Order Note Box — done!
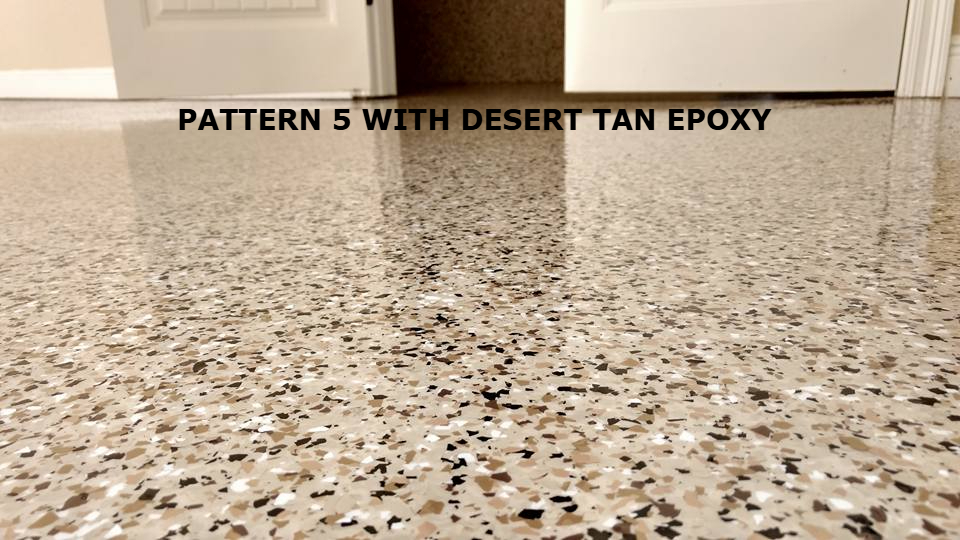
Pattern 5 flakes with custom Desert Tan base epoxy
10 Standard Patterns
- Pattern 1 — Light Gray Epoxy with Black & White Flake (most popular)
- Pattern 2 — Dark Gray Epoxy with Black, White & Primary Blue
- Pattern 3 — Medium Gray Epoxy with Black, White & Primary Blue
- Pattern 4 — Camo Tan
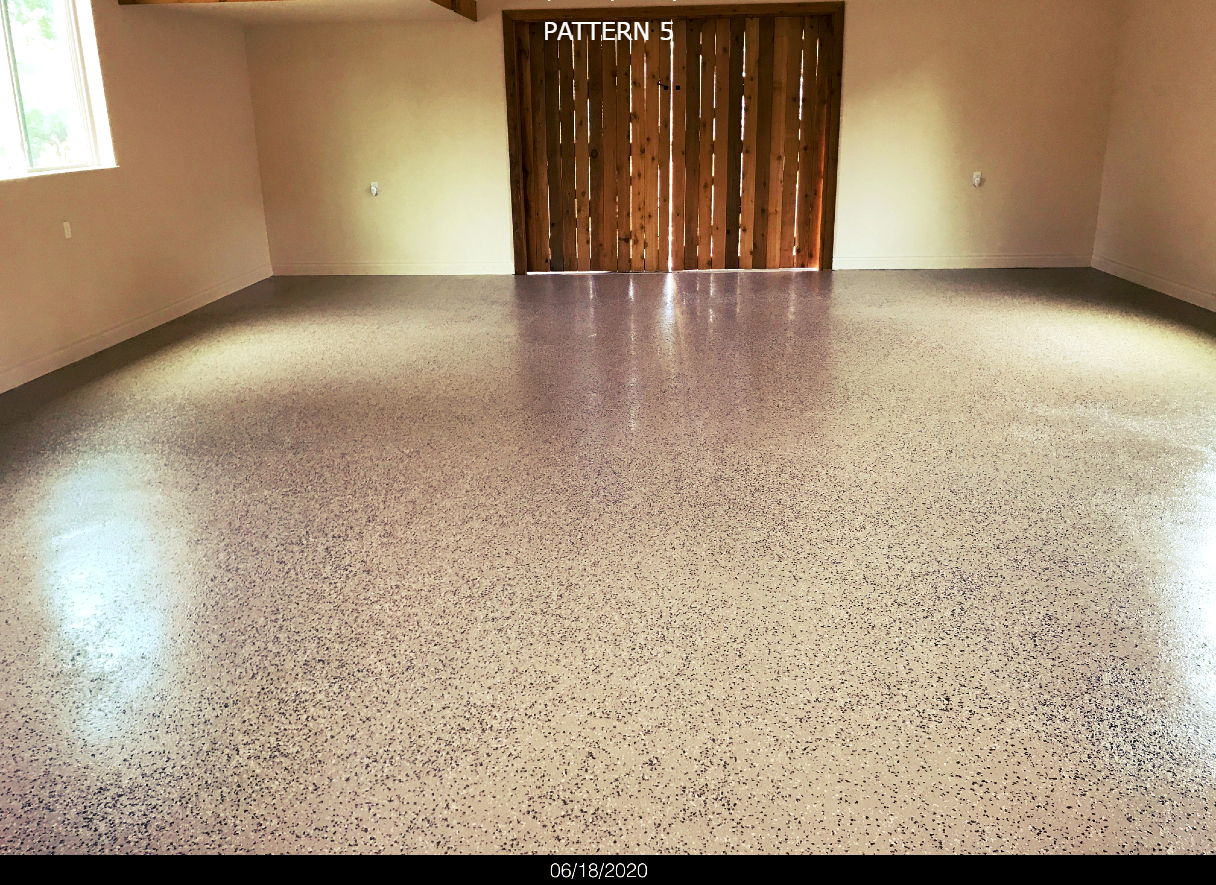
- Pattern 5 — Tan Epoxy with Chocolate, Clay, White & Black
- Pattern 6 — Charcoal Epoxy with Dark Gray, Medium Gray, Light Gray & Black
- Pattern 7 — Charcoal Epoxy with Black, White & Primary Blue
- Pattern 8 — Light Gray Epoxy with Black, White, Primary Blue & Powder Blue
- Pattern 9 — Medium Gray Epoxy with Black, White, Primary Blue & Lipstick Red
- Pattern 10 — Khaki Tan Epoxy with Brown, Chocolate, Beige & Rustic Red
Epoxy Base Coat Color Chart
Click any color to enlarge
How to Order Your Granite Kit
- Select a pattern you like from the 10 standard epoxy and flake combinations above
- Our standard kits ship with pre-matched flake and epoxy combinations — no guesswork needed
- In the "Size" dropdown, select the proper size kit for your garage
- If ordering primer or military topcoat options, match the primer and topcoat size to your floor size — not doing so may result in insufficient coverage
Mix & Match Sizes: You can combine multiple size kits to match your exact floor size. For example, a 275 sq ft kit plus a 550 sq ft kit for an oversized garage.
Customize Your Color Flake Selection
Want to create your own custom combination? Mix and match epoxy base colors and flake colors to build a one-of-a-kind floor. Here's how:
- Select the kit with your desired base epoxy color (use the base coat color chart as a guide, don't worry about the flake colors, they will change to the custom colors you select)
- Browse the flake color charts below and choose up to 5 chip colors
- List your custom chip color & number selections in the "Custom Order Note Box" and we'll swap them with the standard flake colors at no charge
Customer Floor Gallery
Real garages, real customers, real results. Click any image to zoom in and see the detail up close.
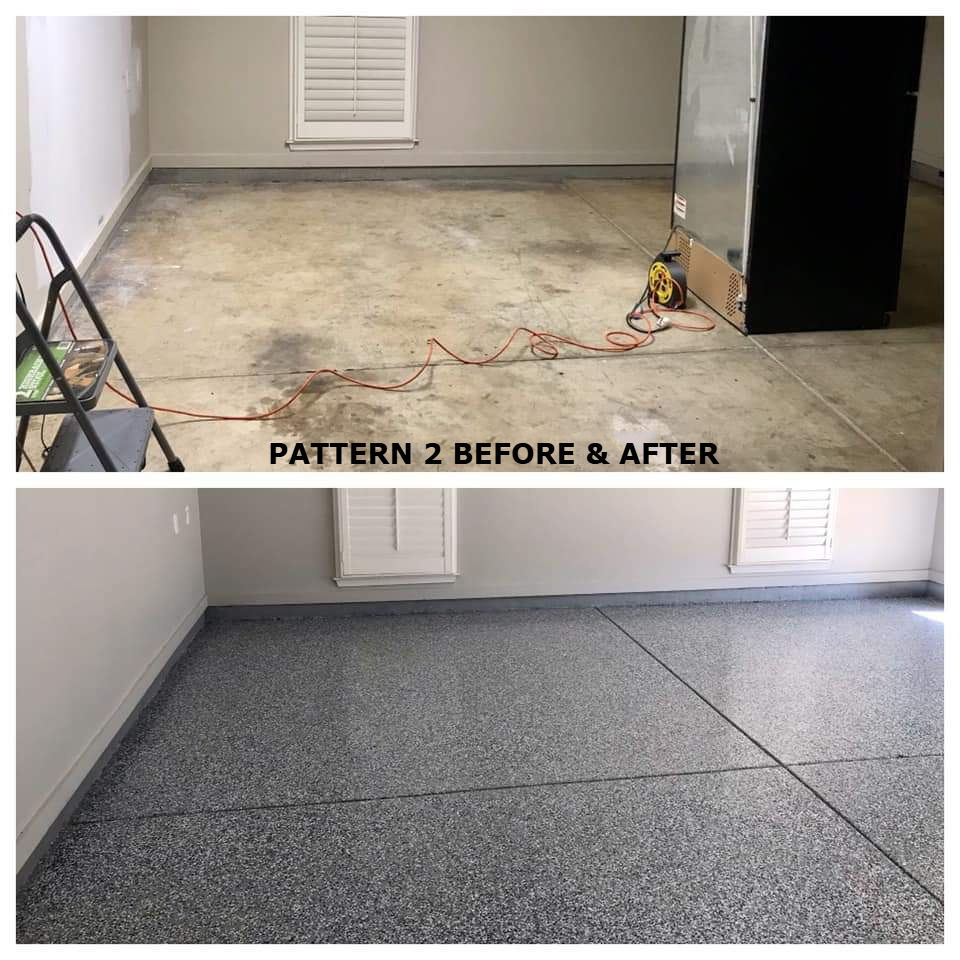
From Bare Concrete to Beautiful: The Full Process
Coverage Guide
Each kit covers approximately 550 sq ft at 25 mils thick — enough for a typical 2½-car garage. Coverage may vary depending on floor texture, porosity, and lighter colors such as Beige.
10% Safety Margin: Allow a 10% margin of safety for different floor porosities. If your floor is close to or over 550 sq ft, we recommend using the primer to extend epoxy coverage up to 675 sq ft — this also gives you a thicker overall coating and better adhesion.
- 275 sq ft
1-car garage - 550 sq ft
2½-car garage - 850 sq ft
3+ car garage
Important: Be sure to match primer and topcoat sizes to your floor size — not doing so may result in insufficient coverage. You can mix and match multiple size kits to match your exact floor dimensions.
Need Help Choosing Your Pattern?
Not sure which pattern or custom combination will look best in your garage? We've helped thousands of customers create their dream garage floor. Tell us about your space and we'll make a recommendation.
Talk to an expert at 866-532-3979 — info@armorgarage.com or Request a Quote for project pricing. We're here to help you get the garage floor you've always wanted.
Armor Granite Garage Epoxy Application Instructions
WATCH THIS 90 SECOND STEP BY STEP APPLICATION VIDEO TRANSFORMATION OF A FAILED EPOXY FLOOR INTO AN ARMOR GRANITE SHOWROOM FLOOR
Installation Overview (Armor Granite)
- Clean floor, powerwash if possible & remove oil stains
- Profile concrete (acid etch or diamond grind)
- Patch cracks, spalls, and surface defects. Use the Instant Crack Repair to avoid waiting for repairs to dry
- Apply primer if required by slab condition or desired extra adhesion
- Apply epoxy build coat
- Broadcast decorative flakes
- Scrape and vacuum excess flakes
- Apply clear protective topcoat(s)
- For very detailed instructions, click the link below.
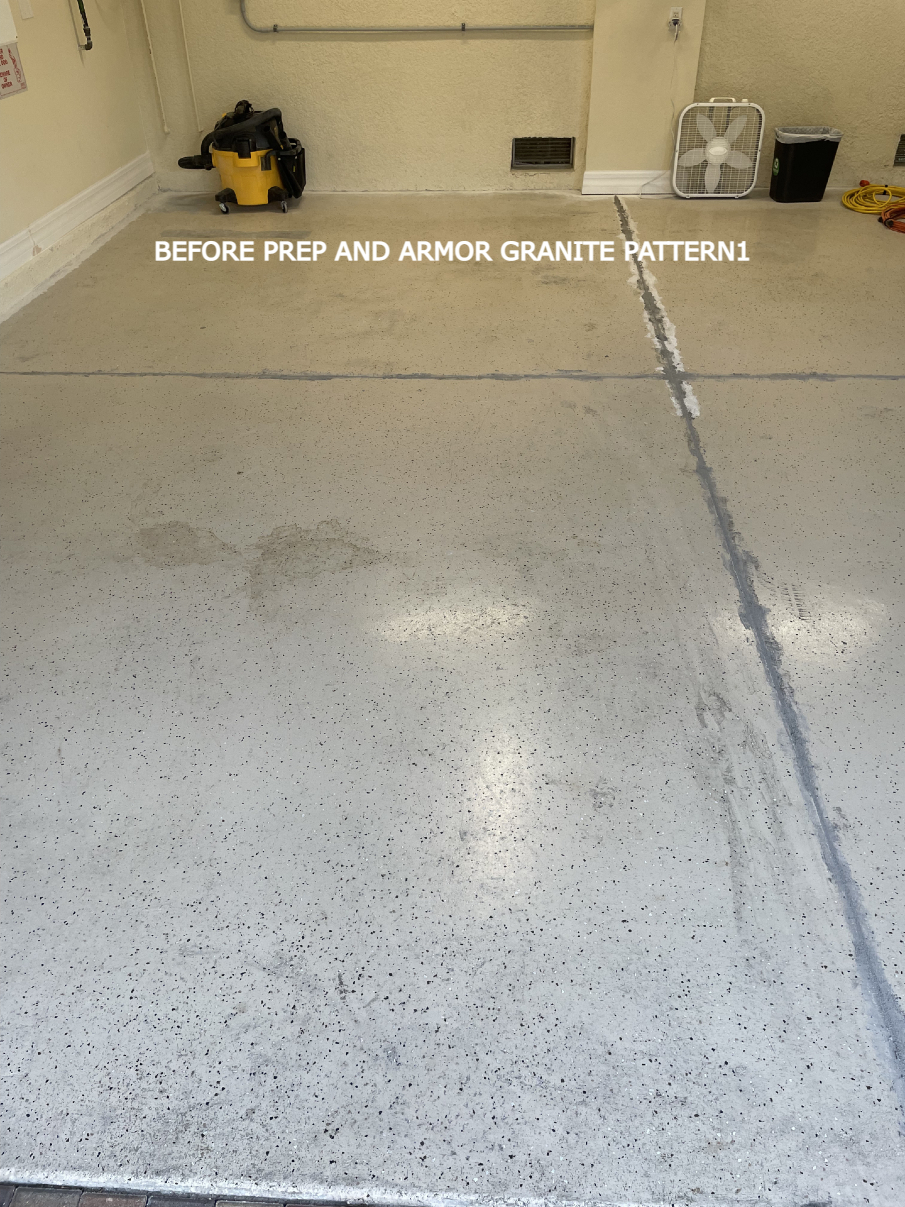
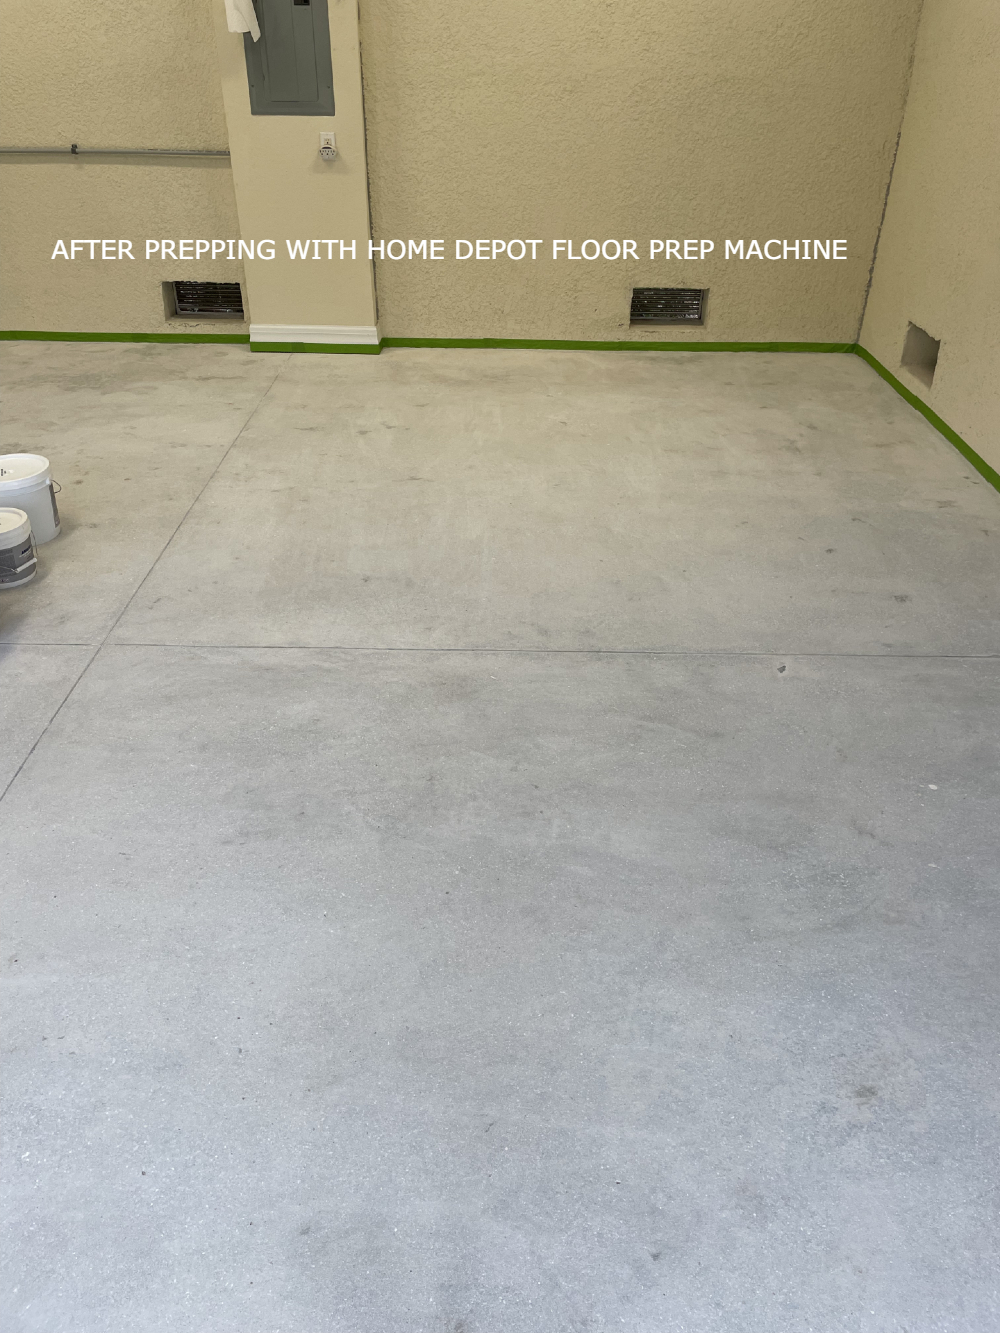
HERE'S A GREAT BEFORE & AFTER OF A PROPERLY PREPPED FLOOR THAT WAS GRINDED.
THE FLOOR PREP MACHINE FROM HOME DEPOT DID A GREAT JOB, OIL STAINS WERE CLEANED WITH LIQUID TIDE AND MURIATIC ACID

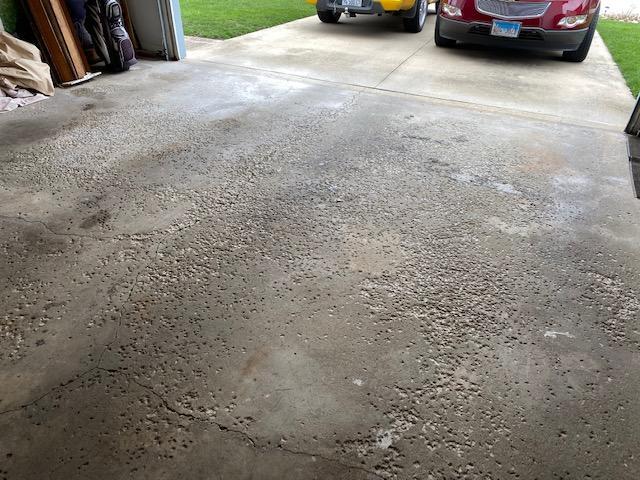
Great Example Of A Floor In Bad Shape Brought Back To Looking New By Diamond Grinding


Your floor should look like prior to coating with any type of floor epoxy paint.

If your floor looks like this STOP and power wash and etch again!
This is usually the result of using an insufficient amount of acid!
We’ve included real-world installation videos from DIY customers so you can see exactly how the Armor Chip system is applied — and learn from their experience.
These videos cover common questions like material coverage, mixing batches, using primers, applying flakes, and topcoating for a professional finish. See this very informative article written by one of our customers ArmorGarage Epoxy Application Suggestions And Lessons Learned
▶ And watch the full step-by-step prep & installation by DIY DAN here
Even If Your Floor Is Badly Pitted Our Garage Epoxy & Concrete Repair Can Produce Showroom Results.


As you can see there's no trace of any of the patching or pitting.
Epoxy Flooring FAQs
The following is a list of questions we get asked the most. If you have a question that is not addressed here feel free to give us a call toll free- 866-532-3979 or send us an email- info@armorgarage.com. It's best to ask as many questions as you can before purchasing and applying any epoxy product. For additional FAQs, see our Garage FAQ page.
Why are ArmorGarage Epoxy Kits better than other epoxy kits?
All our epoxy coatings are manufactured by us using 100% top of the line materials. This results in a much higher quality finished product that is thicker, 10 times harder, last up to 10 times longer and look 10 times better when you're done. Contractor and Franchise company products cannot measure up to this level of quality nor can big box store offerings.
Why does Armor Granite Garage Epoxy cost more than other epoxy kits?
As mentioned above it starts with the quality of the product and when you calculate everything you get with our complete packages and take into consideration the years of useful life of the product our epoxy flooring systems are by far dollar for dollar the least expensive on the market. Also with Big Box brands and other bargain type epoxies you have to grind and start over as soon as the floor gets scratched, starts to wear out or starts to peel up which happens a lot sooner then you think with those types of epoxies.
With ArmorGarage your epoxy floor will last 15-20 years before it needs a facelift. Then all you have to do is roll on a new layer of topcoat and your floor comes right back to new for the next couple of decades of service!
Bargain epoxy coatings are never a bargain! Plus your Armor Granite floor will have a real life granite look to it unlike most flake floors that are blotchy and or look like they have a case of the Measels.
What is the shelf life of the epoxy and topcoat?
If you're not sure exactly when you will be doing your floor there's no need to worry. ArmorGarage kits have a one year shelf life for the epoxy and standard topcoat and 6 months for the military grade topcoat.
Do I Have To Etch My Floor?
Yes, the purpose of etching is to get the floor clean so there's nothing between your concrete and the epoxy. More importantly etching opens millions of tiny pores in your concrete. On new floors we recommend you etch twice! Our epoxy is designed to flow into those pores and expand. Locking and binding the epoxy to your concrete making it virtually impossible to come off. The issue with most other paints and coatings is they either just sit on the surface and or they don't expand into your concrete which guarantees a failure in a short period of time.
Armor Granite is Hot Tire Proof!
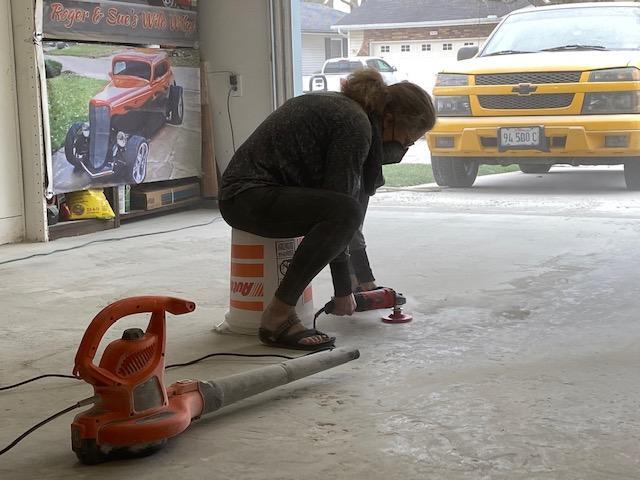
Do I need to etch if I grind the floor and what type of grinder do you recommend?
You don't have to etch if you grind your floor. Most floors can be prepped with the Floor Prep Machine you can rent from Home Depot. It's a very easy machine to use, its basically a floor buffer with diamond brushes. If available also get the Vac attachment, this will reduce the amount of dust you need to clean up. If renting a grinder from a tool rental store get the biggest grinder you can handle and again get the Vac attachment. Also always ask for new bits and try to get 25-30 grit bits. IF you are going to rinse the floor after grinding you might as well scrub while the floor is wet and then do a final rinse. If you use the wrong epoxy coating on your floor and it's stained and peeling up then you need to rent a heavy duty commercial grinder to get back down to the bare concrete. Unfortunately it's the only way to do the job right. If the epoxy is still in good shape you can sand it clean, prime with our Bonding Primer and then apply any of our EPOXY FLOOR COATINGS.
Do I have to etch my new concrete?
Yes! New concrete should always be etched twice to remove curing residues. Old and very dirty floors should be etched twice as well as floors that were power trowelled very smooth. The objective is to get the pores of the concrete opened so that the epoxy locks into those open pores. Our Second Etch Option is great for doing your second etching.
Will The Floor Be Slippery?
All our epoxy kits come with nonslip additive as standard that you add into the final topcoat.
How do I order different color chips than what's standard with your kits and why don't you have a floor simulator?
In the "Custom Order Note Box simply list up to 5 colors that you choose from the Flake Color Chart located on the Color Chart Tab page. There is no extra charge for custom colors and you can order the flakes to ship separately instead of mixed so you can experiment with different color ratios. Plus ArmorGarage has a Color Satisfaction Guarantee. If your not happy with the colors of the flakes when you receive them will replace them with another set of your choosing at no cost! As for why we don't have a simulator, we feel the results you see don't match reality and more often than not it leads to disappointment. Best to look at our customer pictures for the best representations.
My floor is close to or slightly larger than the 550sf coverage of the Armor Granite Kit. What do I do?
If your floor is less than a 125 sf larger(under 700sf) than we recommend that you purchase the Epoxy Flooring Primer. This will do two things. It will extend the coverage of the epoxy and add another layer of coating which is never a bad thing. If your floor is more than 700 sf larger than purchase the 850 Sq Ft Kit, better to have a tiny bit left over than run short.
How long do I need to wait before coating a new slab and do I still need to etch it?
New slabs need to cure for 28 days minimum and they need to be etched or grinded. Grinding is preferred if the slab was power troweled very smooth. The Home Depot Floor Prep Machine does a great job to profile new smooth floors.
How long do I need to let primer dry?
The Primer will dry in 6-8hrs depending on temperature and humidity conditions. Cooler temperatures will require 8-12 hours. Once the primer is dry to the touch you can apply the epoxy. Do not let more than 20 hrs pass before applying the epoxy. Otherwise you will need to lightly sand the primer with 120 grit to rough up the surface.
I do a lot of work in my garage how good will this be for this type of application?
Armor Granite floors are extremely high rolling & static load resistant, high impact resistant, acid and chemical resistant, road salt resistant and even resistant to harsh cleaning solvents like bake and carb cleaners. We recommend the use of the military grade topcoat for the best protection, this will give you commercial auto service shop level protection. Jack stands, Engine hoists and large tool chests are child's play for our floors.
Should I fill in the saw cuts or expansion joints?
No we recommend that you do not. The last thing you want is to have a crack done the middle of your new high gloss epoxy floor. Once you've applied Armor Granite the saw cuts will add dimension to the floor and they will look like big slabs of stone. If your floor is older than 10 years it's probably ok to fill them since the floor is done settling. But you never know for sure what can happen.
Can I extend the epoxy out past the Garage door?
No we don't recommend that. The epoxy should end at the inside or outside edge of the garage door. Use an inexpensive outdoor concrete paint color matched to yor epoxy for that area. This way when it gets beat up by the elments you replace it with inexpensive paint rather than with expensive epoxy coating.
When should I fill in the cracks and will the epoxy fill the cracks in?
If the cracks are surface hairline cracks the epoxy will cover them. If the cracks are deeper than on the surface they may run the depth of the slab in which case you will be consuming a lot of expensive epoxy to fill them. Better to use either the Crack & Joint Compound or the Instant Crack Filler. Crack & Joint Compound goes in before the cleaning and etching, the Instant Crack Filler goes in after and you can apply the epoxy immediately afteryou apply the filler.
How long do I need to let the floor dry after etching?
It's a matter of temperature and humidity, 24hrs is usually sufficient but you should let it dry for 48 hrs to be sure all the moisture has dried out of the floor.
When can I put the topcoat down?
As soon as the epoxy dries hard to the touch, usually the next morning. When you press your finger into it tthere should not be a fingerprint in the epoxy.
When can I put my stuff back in my garage?
The topcoat will dry to the touch in 4-5 hours at which time you can walk on it and put your stuff back in, heavy rolling objects should go back in the next day keep the car of the floor for 3-4 days.
Should I get the Military Topcoat?
We always recommend the Military Topcoat. It's less work since you do only one coat and it's a much harder finish that will keep your floor looking new for 15-20 years even in harsh climates with lots of road salts. If you have smaller vehicles that only go in and out of the garage a few times a day and or you live in a mild climate then you're fine with the standard topcoat. Our standard topcoat is very heavy duty and outperforms 99% of all other topcoats that are advertised as heavy duty. Next to properly prepping the floor the topcoat is the most important thing.
I had an accident and scratched my floor, what can I do?
While your ArmorGarage Armor Granite epoxy floor is hard to scratch it's easy to repair. Scratches are very easily fixed, see the Care & Maintenance page for the details. But it's simply sanding the scratch lightly with 120 grit and brushing on some topcoat
I've had my floor for many years and it's finally starting to wear out, what do I do?
Easy just give a light sanding and roll on a new topcoat, that will bring the floor right back to new. The epoxy and chips should last indefinitely.
How long does this process take?
In actual hours it's not much at all but since you have dry times you should allow 3 days to get the job done. If you grind you can save a day or two since you don't have to wait for the floor to dry. Total working hours should be no more than 5-6 hours.
Can I paint my curbs?
You can coat your curbs whether they are concrete or block. Just allow a little more material when doing block curbs since they absorb more material. You can also do wood molding and steps in your garage.


