


HOW TO AVOID AN EPOXY FLOORING FAILURE

Why And How To Avoid An Epoxy Floor Failure.
- The most common reasons for a failure in your epoxy floor coating are, the floor was not properly prepared, the epoxy floor coating used was water based or other low grade type of epoxy, the epoxy was not rated for the type of traffic on it and or the floor has an issue such as moisture, oil stains, corrosion or granular concrete with exposed aggregate.
Let's go into each of these issues one by one. The most critical factor when applying an epoxy to your floor is to have the floor 100% perfectly clean and the pores opened. If your floor looks like either of the floors below and you apply any epoxy paint to it you will have a guaranteed failure. These floors are not epoxy ready! The reason for this information and other information on our website is so that you only do your floor once!


YOUR FLOOR MUST LOOK LIKE THIS IN BOTH CLEANLINESS AND OPEN PORES.
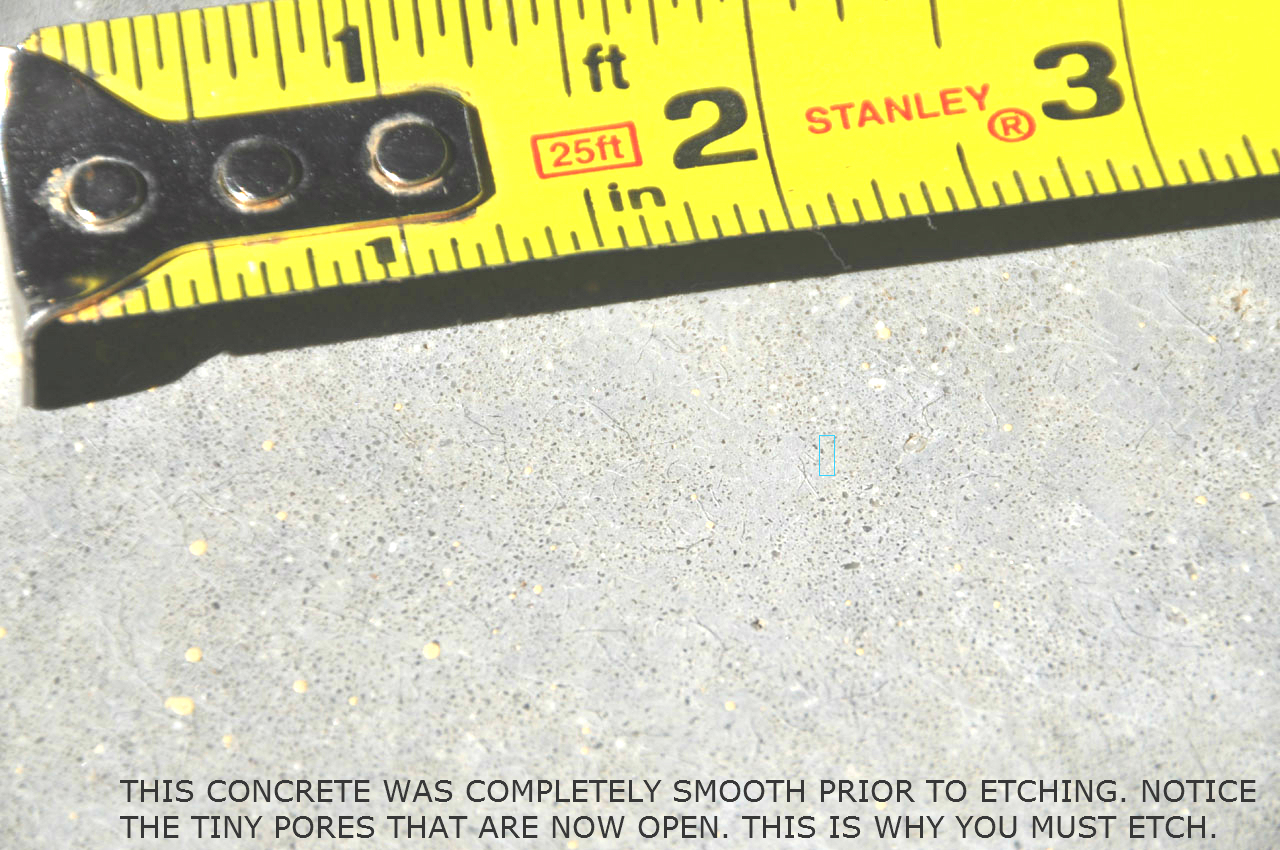
All those little pores are where the epoxy goes and locks into. It's critical that you create a surface profile for the epoxy to lock onto.
This is achieved via one or more acid washings with the proper amount of acid or grinding. Using the right amount of acid is critical when acid etching, many home improvement kits do not supply enough etch for packaging or costs reasons or both. We recommend one gallon of etching acid for every 500-600sf and 1/2lb of neutralizing powder to bring the slab back to the proper PH. Always check how much acid you're getting if doing an acid etch.If your floor is very dirty or new you need to double the amount of acid in order to do two etches and then neutralize on your final rinse. If etching is not feasible you can rent the Floor Prep Machine from Home Depot for small to medium size jobs (get the vac attachment if available) or you can rent an industrial diamond grinder from your local tool rental place, Get the biggest grinder you can handle and always ask for new 25 grit bits. Renting a grinder with a vac attachment will make cleanup a lot easier.
If you can't get your floor to look like the above via either of these methods then do not epoxy your floor. It doesn't matter whether it's a garage floor, commercial floor or an industrial floor you want to apply an epoxy to. It has to be clean. If you have oil stains then wash them out with some Liquid Tide or Dawn Dish Detergent and muriatic acid. If that doesn't do it then you need to use our Oil Bonding Primer. This is designed to bond with oils in a floor allowing you to coat over it with any of our epoxy coatings.
So the bottom line is the floor has to look like it's a new floor by whatever means necessary. If you are acid etching make sure you scrub every inch of the floor with a stiff bristle shop broom. Especially the tire areas. If you miss a spot it means you didn't get the contaminants out of that spot and it could turn into what we call a pop. A small little piece of the coating my just pop off at some point in the future. It will seam like a mystery at the time but the reason will be that a spot wasn't etched or grinded fully. It's easily repaired but just as easy to avoid them in the first place. So if you have to, do a second etch to be sure the ENTIRE floor surface is clean and profiled. If you diamond grind make sure you run the grinder head over every square inch of the floor surface and that ALL the dust is off the floor prior to applying and epoxy coating.
Next up is is the quality of the epoxy you choose to use. With epoxy coatings the saying you get what you pay for couldn't be more true! The most common garage floor epoxies are water based epoxies you find in home improvement stores and local paint stores are just paints with some additives to allow them to be legally called epoxies. Most are only 2-3 mils thick which is basically the same as ordinary enamel paint. Paint is not for your floor, it's for your walls and ceilings. You want a coating on your floor and preferably an epoxy system which is a combination of epoxy and a polyurethane topcoat with a thickness of 14 to 25 mils thick. Next issue with most epoxies is their abrasion rating. Most epoxy paints have terrible abrasion ratings. There is a test called the Taber CS-17 abrasion loss test. This is the bible, the industry benchmark on how durable an epoxy is. It's an abrasion wheel set at a standard weight and spun at a certain RPM for a certain time and then the amount of epoxy that comes off is measured in mgs. The lower the amount that comes off, the harder or more durable the epoxy is. Most epoxies have loss ratings of 24-50mgs or more! Our military grade topcoats have a milligram loss rating of only 4 mgs! The best in the industry and its why ArmorGarage floors still look new 15-20 years later.
Epoxy Coatings with milligram loss ratings of 24-50mgs are no better than regular enamel paint ratings. So if you start with a very thin paint with a high abrasion loss rating, we guarantee you that paint will disappear on you very quickly. Most low quality epoxy paints such as Cycloaliphatic epoxies do not come with a topcoat and some topcoats are not even really topcoats, they are just clear versions of their cycloaliphatic epoxy with some UV additives. This does not make an epoxy a topcoat! It still has the same lousy abrasion loss rating. Also note that the Taber loss ratings are like the Richter scale, each mg of loss is exponential. So don't listen to hype, look at the specifications of what you are buying and check the abrasion ratings. If you do nothing else this is the most important thing you should do!! We go over how to choose the right epoxy for your floor in GREAT detail on the Epoxy Coatings Facts & Fiction page.
The How To Prep Your Floor page is a super important page. But it's important to first finish reading this page and the Epoxy Facts & Fiction page. If you purchase an inferior product or the wrong product for your floor all the good prep work you did will be for naught since that product will fail for sure.
Once you got the floor cleaned properly and you purchased a high quality epoxy then the only thing that can go wrong at least when applying our epoxy is that you mixed it in the wrong ratio or there's an issue with your floor.
We make all our epoxies in large batches and test each batch for hardness and adhesion. When we do a pull test on our epoxies, the epoxy comes off in the puller with the top layer of the concrete test slab on it. So we know it's not our epoxy that will peel off your floor. If your floor has a high level of moisture, that will cause a failure. If your concrete is soft or chalky a failure can occur under stress conditions such as when your tires with the dead weight of the car on them twist or turn on the floor. In these cases you will see your floor stuck to the underside of our epoxy! We strongly advise using a primer if your concrete is in any sort of compromised condition such as in the images below. This actually is not an epoxy failure but rather a floor failure.

 Here's another type of concrete to look out for. It's called a pea gravel slab. See all those black spots they're pea gravel or river stones which are very smooth and nonporous. Which makes them very difficult t o get anything to adhere to them. If you have a slab like this you need to use the Bonding Primer first. These types are floors are not very common, they're the result of the contractor cutting corners when he poured the floor to save money. As long as you know what to look for it's not a problem.
 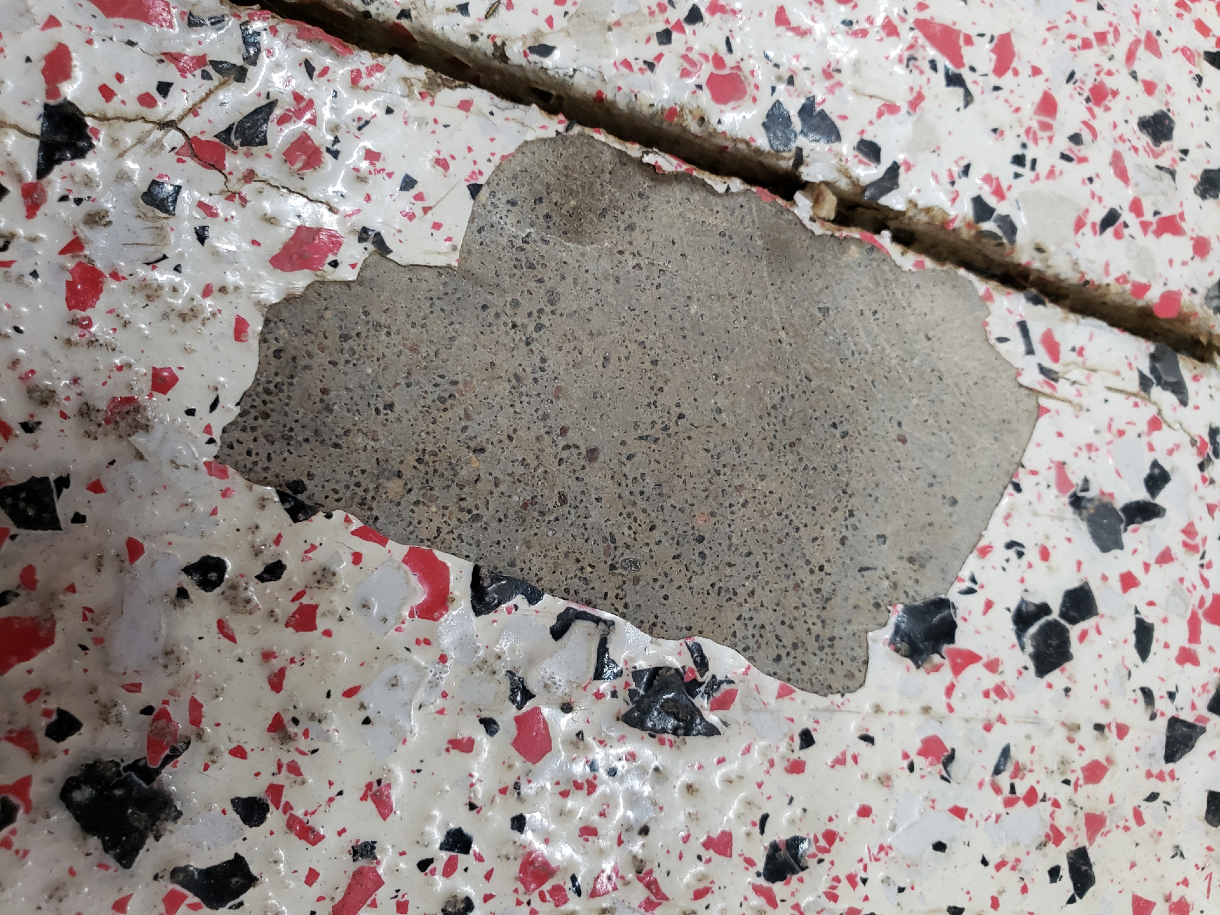 So to sum it up do whatever it takes to make sure your floor is 100% clean. Choose a good quality epoxy coating that is rated for your application. Just don't put down whatever epoxy sounds good or whatever you can get a deal on. For garages make sure you have a polyurethane topcoat that has 20mgs abrasion rating or lower. For commercial repair shops or work shops make sure the topcoat is 8mgs or lower. For heavy usage floors such as forklifts, continuous rolling carts, high pallet jack traffic then go with a 4 mg or lower topcoat. If your floor is in poor condition or has exposed aggregate where you can see the little rocks and pebbles in it, use a primer! If you are coating over an existing epoxy coating make sure it is still well bonded to the floor and use our Bonding Primer first. Many times different epoxies will reject each other.
Just a note on garages, if you have large vehicles and or do work in the garage we strongly recommend you go with our military grade topcoat(4 mg loss rating). Believe it or not garage floors since they are usually tight quarters get a lot of twisting turning tires in small areas that put a tremendous strain on a coating. If you don't have an epoxy with a high adhesion rating and a topcoat with a really good abrasion loss rating that epoxy paint/coating is going to wear and or peel off your floor very quickly.
Prior to buying do a scratch test, if you can easily remove concrete from your slab by simply scratching it lightly, there's something wrong with it. At the very least you will want to run a floor prep machine over your floor to remove a layer or two of the weak concrete. You can rent a machine from Home Depot or a diamond grinder from your local tool rental store. Then we would strongly recommend doing a primer to soak into the slab and strengthen it. Do a moisture test by taping down a 3 or 4 foot square of plastic with duct tape. Make sure you seal the plastic all around 100% with good duct tape. Let it sit for 2-3 days and then check for moisture underneath the plastic. No moisture is good to go, moisture present means you need to call us on what you need to do to prep that floor properly. Most garages built in the 70s or earlier most likely did not have vapor barrier installed under the slab. If you live in a high water area this will cause a moisture issue in your floor. You may be better off not epoxy coating your floor but instead use garage tiles or a garage mat.

