


HOW TO DO CUSTOM EPOXY FLOORING DESIGNS
Custom Garage Epoxy Flooring Designs

Learn How To Epoxy Paint Your Garage Or Commercial Floor With Custom Designs
Most people who decide to epoxy paint their garage floors have never worked with a garage epoxy paint or even painted a floor before. So they tend to stick to the standard applications and it's why we put together kits that contain everything you need to do a floor. You need to have everything on hand for the job to come out right and that's what we do for you. All ArmorGarage epoxy flooring kits come with everything as a turnkey package with detailed instructions that make it possible for even the least handiest person to get a professional looking epoxy floor finish.
That's most people and then there those of you that want something more. With epoxy paint you can make just about any design you can think of but just keep in mind it's a lot more work and expense. Unlike our competition that puts up some fancy photos of floors and tell you that all you need is some tape and a template to get the same results. We're here to tell you its not that simple. We on the other hand will show you some outrageous looking garage epoxy floors and tell you exactly how it was done. We also recommend that you call us to discuss the material list you will need to make your design a reality. Custom epoxy floors use a lot more material than standard applications. We'll go over your design and make sure you have all the materials and application tools you'll need to get the job done.
A word about metallic epoxies here would be appropriate. We get asked why we don't make an metallic epoxy floor coating. We do but it's not as DIY friendly as it's made out to be. We don't even let our epoxy installers do it! When one of our customers wants a metallic floor we have a specialist who does it everyday for a living install our product for us. So be very careful when deciding on a metallic floor, its best to have a professional install it for you. Otherwise more likely than not you will have an expensive disappointment on your hands.
So the first step is to sketch your design out on paper and estimate the square footage of each different color you will be using. This way we know how much epoxy paint in each color you'll need as well as how many pounds of color flakes you will need.
Next make sure you have a helper and a lot of patience. You need to be meticulous in laying out your design in tape on the floor. Make sure you buy the best painters tape you can so that you don't get any seepage under the tape.
Ok so lets get started, here's one the best floors we've seen in a long time done by Francine. Francine worked with us very closely to get this right with many phone calls during the purchasing process. Some companies may have been put off by the amount of phone calls but we welcome it, we want to make sure your floor comes out the way you envisioned it. Better a few extra calls than to have a permanent epoxy mistake. As you can see her floor came out spectacular!
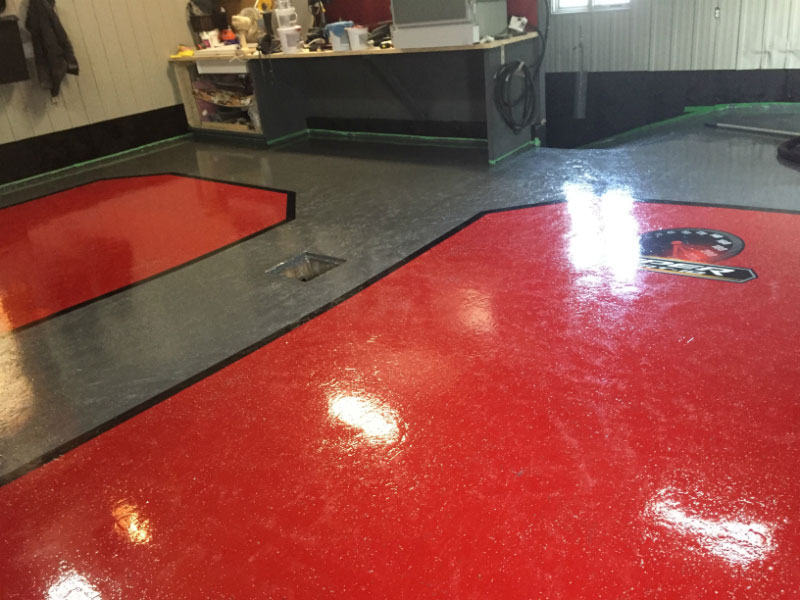

After determining the amount of epoxy paint in each color she needed and the amount and color of each of the flakes she wanted we put together the entire package in a kit and shipped it up to her in Canada. The following is how she did it.
First thing she did was prime the floor in Light Gray. That's after she did an extra good job in etching and cleaning the floor. We encouraged her to etch and clean twice, to use our epoxy primer and to topcoat with our military grade clear coat. The reason being is that the floor she was doing was going to be rather expensive and so will your custom design. So you want to go the extra mile to make sure you get a floor with the longest lifespan possible. Plus the primer will make sure each of your colors stay true without any bleed through.
So after priming she measured and penciled in her lines in the shape of her design. She started off taping down the dark gray portion. Once the dark gray was dry she taped the edges of the dark gray to form the border with the red.
A word about using red, red is the most expensive epoxy color you can use. The pigments to make red epoxy are super expensive and you need a ton more to get that bright red color. Plus red does not cover well along with white. So when using red or white make sure you buy plenty of extra epoxy, you'll need it.
So after taping the gray off she applied the red and removed the tape. She was doing a black border line over the gray and red so she didn't have to be perfect with the red/gray border. If you're not doing an overlay border line then you need to be perfect with your tape lines to get a clean straight edge between the two different colors. That is why when you see some checkerboard floors without grout lines or overlapping lines on competitor's sites they don't go into detail as to how it's done and make it sound easy. They simply say to use a template and some good tape, Really! How do you tape the template down, how much tape overhangs the edges of each template so that your squares match up exactly without overlapping or big gaps? How many templates, one that you use over and over or do you need one for each square? How do you center the templates? All questions that you need to have answers to before you start painting! Ok back to Francine's floor.
While applying the dark gray and red epoxy she sprinkled her color flakes which included some metallic silver for extra effect into the wet epoxy. Leaving the area where she planned to apply the decals without flakes. She also scraped the flakes down flat prior to the topcoat. Once the epoxy was dry she taped out the black border lines. This is where you need patience so that the lines are straight. Since the gray cured for more then 24 hrs due to having to wait for the red to dry, she needed to lightly sand with 100 grit paper where the black was going to overlay. The rule is that anytime you are over coating an epoxy that has been down for more than 24 hours you must sand to scuff it up. Otherwise you run the risk of it peeling in the future. Since you're doing this floor to last 20 years or so, no peeling is allowed, so make sure you sand. The black border was rolled in between two tape lines with a 3" roller. The black adds to the look and covers up any uneven lines between the red and the gray.
Once the black dried it was time for the clear coat. Since now both the red and the gray have been down for more than 24 hrs she sanded the entire floor to scuff it up. She put down the vinyl decals and applied a nice coat of our military grade clear epoxy topcoat with our heavy duty aluminum oxide nonslip additive.
So there you have it. A special one of a kind garage epoxy floor done perfectly by someone who never did anything like this before and for a fraction of the price a company would charge. Next up Rick's floor.
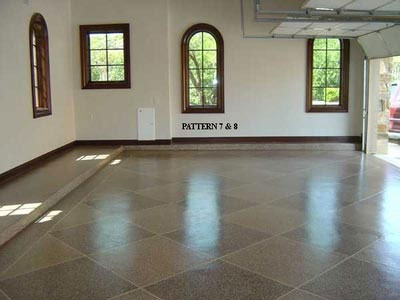
Or you can prime the whole floor the same color as the epoxy paint. Again if you are going through the added expense and time to do a custom floor it's not a bad idea to prime the whole floor with our epoxy primer after you do an extra good prep on the your floor.
Once the the first coat is dry you will pencil in the grid lines and apply 5/8"-1" tape depending on how wide you want your grout lines. We like 3/4" lines. Again here's where you need patience to get the tape lines straight and symmetrical. Once the taping is completed you now mix and apply the epoxy paint into each square and apply the two different color chip combos into alternate squares. As the epoxy starts to setup you can start carefully removing the tape. Once you remove all the tape you will see the grout line effect. Then scrape the chips down flat the next day and apply the topcoat. Again we strongly recommend going with the military grade topcoat.
Next is Max's Corvette epoxy floor.
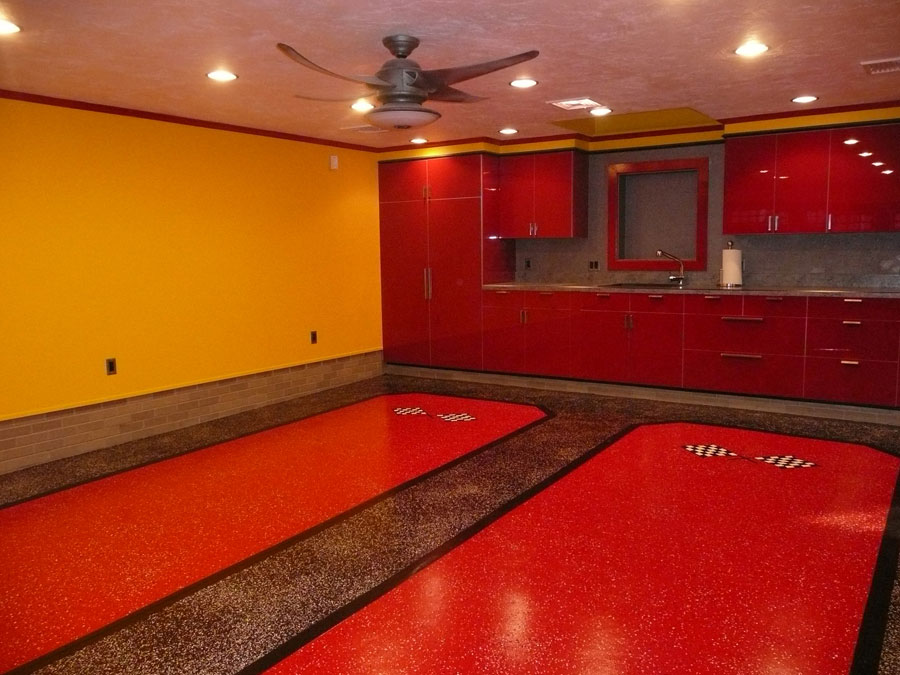
As you can see you can do just about any design you want. This was Black and Red with all metallic silver chips. This floor is done the same as Francine's floor above was done. Again we recommended he use the epoxy primer first and then finish up with the military grade topcoat.
Ed's Epoxy Floor
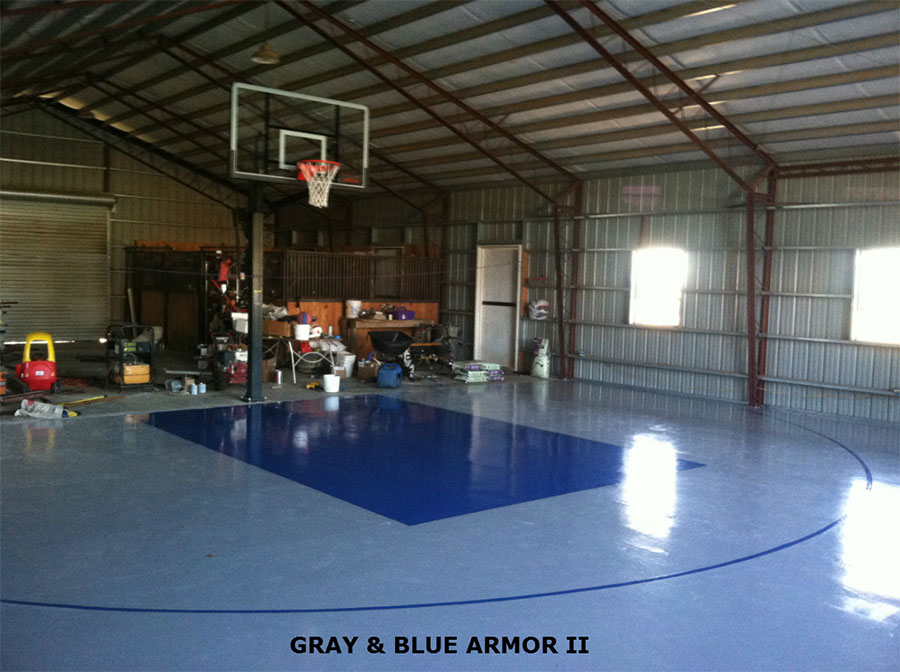
Ed loves to play basketball with his kids so he did his floor in a basketball court design. This was fairly straight forward. He went with the Armor II commercial epoxy floor coating and no color flakes. He did the whole floor with the Armor II primer in gray then he applied the gray Armor II topcoat over the entire floor and then he taped off the blue areas and applied the Armor II topcoat in blue over the gray topcoat. This gave him a very durable floor that can take years of sneaker scuffing basketball playing.
Here's one for all you football fans!  This is fairly easy to do and can be done for any team or sport. The most important thing is that you get good quality decals that are epoxy paint compatible. When using the Armor II system which was used on this floor. We recommend you apply it at a lower coverage to get a thicker base coat. The reason being that in standard applications there is a base coat and then a topcoat of the same color which does two things. It gives complete color coverage and provides a harder finish than the epoxy. When doing decals you can't use a pigmented topcoat. You have to go with a clear for obvious reasons. So we recommend putting on a thicker base coat to ensure you don't get any concrete bleed thorough and a nice deep even finish. We would add 20% to your actual floor area as a safety factor.
  Declan did this amazing looking floor floor as follows. He did two coats of the Armor II Commercial Epoxy Floor Coating primer first. Letting the first coat dry before applying the second coat. Once the second primer coat dried he applied one coat of white Topcoat. Then he used a laser to help mark out 23" squares in pencil. We recommend you use 3M pin striping tape to tape off the squares. He then did one thick coat of Black Topcoat. He let the black set up for about 5 hours and then carefully pulled up the tape. He applied the nonslip in both the white and black topcoats.
So in sum if you want to do a custom epoxy flooring design for a garage floor or a floor for your business give us a call 1-866-532-3979. We'll be happy to go over the method on how to do it and put a custom epoxy kit together for you to make it as easy as possible to get a floor as good looking as the ones above.

